
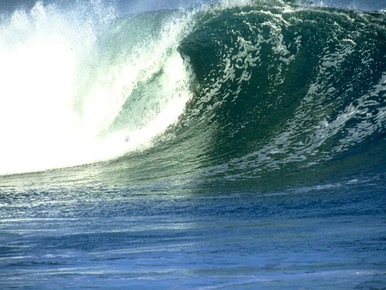
 Shaping a wave is the most important part besides the foam pattern. The shaping of the wave sets the guide for the foam and makes it easier to layout your foam. So how do you shape a wave? When shaping a wave you want to use 3 different color tones. This giving it movement. Have you ever been to the beach and seen the sun playing on the water? If you have you can see multiple colors and that's how you can see all the movements in the water. So when we are trying to make a wave or ocean water realistic we need to use multiple colors to make the water move. Take a look at the clip. Brandon shows you have to shape a wave to get the water moving and ready to layout the foam. He also uses his filbert brush to paint the tones in the same direction he wants the water to move in and the same way he will paint in the foam.
0 Comments
Your bushes looking like a mudslide? 
push the brush slightly into the canvas. With a lot of paint loaded in the brush to a dog paw ( a rounded edge ) with some Amazing White medium. And he is barely putting that brush to the canvas. Another common reason for getting mud is getting the paint to thin adding to much Amazing White medium. You only want the paint to have a little pull to it. So when adding Amazing White medium just add a little at a time until the paint becomes creamy not thin you should feel a little pull when loading the brush. Another common reason for a "mudslide" is using your wrist to push the brush into the canvas this causes your brush to move up and will make a smear or a "mudslide" remember to keep the brush firm and loaded with a lot of paint. Most beginners load their brushes with very little paint not wanting to waste it because it cost so much. But remember your paint will work for you as long as you use it! So add some paint to your palette and get MONKEY FACED ON IT!!
Brandon is a nut for painting mountains. Many people ask how can I paint mountains like him? We took one of Brandon's videos and cut the mountain part out and made it, its own video. So you can just focus on the mountain part. This is just a short clip so you can focus on how Brandon painted the mountain.
When painting your mountain you need grip so painting mountains go back to the prep,before you start painting your sky. You want to use Amazing White to coat your canvas. Other white base coats will not give you the grip you need. Other white base coats will not let your paint stick and this making it almost impossible to break paint across the mountain. Brandon designed his white base coat to get tacky and give grip so highlighting mountains will be a lot easier. Now on to the mountain! when mixing your mountain base color you want to use a dark color. This way your highlights pop off the canvas. Now if you want a distance mountain use a light base for the mountain by just adding Titanium White to the mixture. Here is the Mixture 1 part Prussian Blue or Thalo Blue : 1 part Ivory Black : 1 part Alizarin Crimson: If you want this to be a distance mountain add 1 part - 2 parts Titanium White. The more Titanium White the more your mountain will be in the distance. Load a roll to the palette knife and with firm pressure push in your mountain. Scraping the color as you go. After you layout your mountain take a 2" or 1" Landscape brush and pull out the mountain. This will help your highlights and shadows stick better. Highlighting: When highlighting you want to use a good size roll of Titanium White paint when starting out, this will make it a lot easier for you to get the paint to break. Now with no pressure think like your sliding on ice just let the paint touch the canvas and then give it a little pull. !!!!WARNING!!!! make sure your index finger is !!NOT!! on the back of the handle of blade this will cause your paint to not break even if you are using no pressure it will not break!! After adding your highlights add the shadow Shadow color mixture: 1 part Titanium White: 1 part Prussian or thalo blue: If you want the shadow to be toned down add a touch of burnt umber. Then just like when highlighting the mountain do the same to the shadow side. After adding both the highlights and the shadows. Take the 2" Landscape brush and crunch the base out. this will create mist. 
Brandon Thomas Art is happy to announce our new art supply store! Brandon Thomas Art Supply . Here you can buy the right brushes, tools, mediums and more that artist Brandon Thomas recommends! when you buy from us you support the show and will get the right set of tools you need every time. We have put together a kit of brushes and tools that you will need at a low priced budget. Each product on the store Brandon Thomas has used and recommends to his students and viewers.
www.BrandonThomasArtSupply.com or click Shop Online Digital DownloadsNew to the Brandon Thomas Art video library Digital Video Downloads Are a fast and easy way to get your educational video anytime and anywhere! No Shipping, No disk to get scratched or lost and its instant after purchase. Check out our new Digital Downloads TODAY only $10.00 Painting With Magic TV seriesPainting With Magic is going to TV the new series will be airing some time next week or by the beginning of next month. This is a whole new series of Painting With Magic. I though I give everyone an update about the TV series.

Please welcome our new sponsor Jerry's Artarama! This company is the biggest name in the art world. They have the best customer service to help you on your journey in creating your next master piece! They have the best products and educational material in the market. I am so honored and excited to be apart of a company who has such great respect for artist! Jerry's Artarama is the company who will take your art to the next level! go check out their website and see why they are the best in the business!!
|
AuthorBrandon Thomas, CategoriesArchives
August 2021
Categories |
 RSS Feed
